Mist Brush Set: Mastering Atmospheric Texture in Digital Art
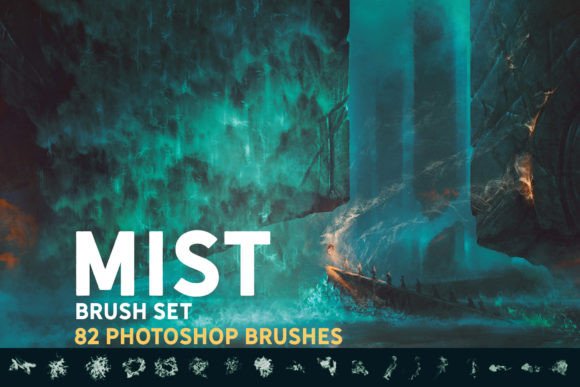
Digital painting often suffers from a common affliction: it looks too clean. When every edge is sharp and every color block is uniform, the artwork can feel sterile, lacking the organic chaos found in nature. This is where the Mist Brush Set becomes an indispensable tool for artists ranging from concept designers to hobbyist illustrators. Comprising 82 unique Photoshop brushes, this collection is designed not merely as a library of static stamp overlays, but as dynamic tools that allow you to actually paint with atmosphere. Whether you are working on intricate sketches, building a solid base for illustrations, or crafting expansive matte paintings, understanding how to leverage these textures correctly can elevate your work from amateur to professional.
Beyond Simple Stamping: Understanding Dynamic Painting
A frequent misunderstanding among beginners is treating texture brushes like stickers. Many users download a pack, select a mist shape, and click once on the canvas. While this has its place, it rarely yields convincing results. The Mist Brush Set is engineered for interaction. These brushes respond to pressure, tilt, and speed, allowing you to build up density gradually. If you treat them as simple stamps, you lose the ability to control the flow and opacity that makes fog, smoke, or haze look realistic.
To avoid this pitfall, approach these tools as extensions of your traditional media. Think of them as wet watercolor or soft charcoal. Start with low opacity and build layers. This method gives you control over the translucency of the mist, ensuring it interacts logically with the light sources and objects in your scene. By painting rather than stamping, you maintain artistic intent and avoid the "copy-paste" aesthetic that can detract from the immersion of your piece.
Compatibility Misconceptions and Workflow Efficiency
One of the most overlooked details when acquiring digital assets is software compatibility. Artists often assume that a brush set labeled for Photoshop will work seamlessly everywhere, or conversely, that they are locked into a single ecosystem. The Mist Brush Set offers broader utility than many realize, but it requires correct installation procedures to function properly.
These brushes are natively compatible with Photoshop CC and Procreate 5.0. However, many users do not know that .abr files can also be imported into Clip Studio Paint v1.10.5 or newer and Affinity Photo. A common mistake is attempting to use older versions of these programs, which may not support the advanced dynamics embedded in the brush files. This leads to frustration when the brushes appear flat or unresponsive.
Before purchasing or downloading, always verify your software version. If you are using Clip Studio Paint, ensure you are on v1.10.5 or later to access the full range of pressure sensitivity and texture mapping. For Affinity Photo users, remember that while the brushes import, the interface for adjusting their dynamics differs from Photoshop. Taking ten minutes to read the specific import guide for your software can save hours of troubleshooting later.
Avoiding the "Muddy" Look in Concept Art
In concept art and matte painting, mist is often used to create depth and separate foreground elements from the background. A critical error artists make is overusing these brushes, resulting in a "muddy" image where contrast is lost and details are obscured without purpose. This usually happens when the brush hardness is set too high or the color chosen is a flat gray.
To correct this, consider the color temperature of your environment. Mist is rarely pure gray; it reflects the ambient light. If your scene is lit by a warm sunset, your mist should have subtle orange or pink undertones. Use the Mist Brush Set to paint these color variations directly, rather than adding a monochrome overlay afterward. This approach integrates the atmosphere into the lighting calculation of the piece, making it feel cohesive rather than applied on top.
Additionally, vary the scale of your brushes. Using only one size creates a repetitive pattern that the human eye quickly identifies as artificial. Alternate between large, soft washes for general atmosphere and smaller, detailed tips for wisps of fog catching on tree branches or architectural edges. This variation mimics the chaotic nature of real-world weather phenomena.
Choosing the Right Tool for Your Skill Level
While the Mist Brush Set is powerful, it is not a substitute for fundamental knowledge of light and perspective. Beginners sometimes rely too heavily on specialized brushes to fix composition issues. If the underlying drawing lacks proper depth cues, no amount of atmospheric brushing will save it. Use these tools to enhance what is already there, not to hide structural weaknesses.
For educators and freelancers, this distinction is vital when communicating with clients or students. Explain that these brushes are accelerators, not magic wands. They speed up the process of rendering complex textures, allowing you to meet deadlines without sacrificing quality. However, the artistic decision of where to place the mist remains a human skill. A well-placed wisp of fog can guide the viewer’s eye to the focal point, while poorly placed mist can distract and confuse.
Practical Steps for Integration
To get the most out of this collection, integrate it into your workflow systematically. Start by creating a test document. Import the brushes into your preferred software and spend time adjusting the settings. In Procreate, tweak the streamline feature to see how it affects the smoothness of your strokes. In Photoshop, experiment with the transfer dynamics to see how pressure affects opacity and flow.
- Test on different backgrounds: See how the mist interacts with dark versus light areas.
- Layer modes: Experiment with blending modes like Screen, Overlay, or Soft Light to achieve different atmospheric effects.
- Masking: Always use layer masks when applying mist. This allows you to erase parts of the brush stroke non-destructively, refining the edges until they look natural.
By taking these preparatory steps, you avoid the common trap of jumping straight into a final piece and struggling with unfamiliar tool behavior. The Mist Brush Set is designed to be intuitive, but intuition is built on familiarity. Spend time exploring the 82 unique variations to find the subset that best matches your personal style. Whether you are creating ethereal fantasy landscapes or gritty urban scenes, mastering these tools will add a layer of professionalism and depth that distinguishes your work in a crowded digital marketplace.